
Loading knowing01 App…
You are working on Version 1.7 released August 2026. See what's new.
This page is a practical guide to working in our app. If a question is not answered here, just drop us a mail at any time.
The knowing01 app assists you in exploring and connecting your experimental data quickly and independently.
Getting started:
About the Cellmap: The major ingredient of the knowing01 app is our proprietary Cellmap, a knowledge-graph that enables automatic translation between your data at unprecedented speed. To leverage the full information from the Cellmap, we automatically link your data to it directly after file upload.
Get in touch: If you are stuck or something is unclear, we want to know, help and do better. We would love to hear from you at any time.
The Data center Dashboard provides a structured overview of your studies, datasets and hooks in a single view. Key metrics, status indicators and tag-based breakdowns let you see the state of your data foundation and spot any datasets that are linked with issues at a glance.
Each study groups one or more datasets under a shared scientific context. While only minimal information is required to create a study, the more detail you provide, the better the app can support downstream analyses, grouping, and interpretation.
The name will be used to represent the study throughout the entire app. We recommend choosing a concise label, for example the first author, publication year, and journal (e.g. Li et al. (2025, Nature)).
The relevance and methodological quality fields allow you to rate the applicability and scientific rigor of the study for your project. This helps prioritize studies during analysis. Rating is based on a three-tier scale: low, mid, and high, where high indicates strong relevance or excellent quality, mid indicates moderate relevance or acceptable quality, and low indicates limited relevance or methodological concerns.
Provide the original title, authors, year, journal and a link to connect the study to its primary publication. This information is displayed in the study view and can be used to trace results back to the source literature.
Use the summary field to briefly describe the study's scientific background, key findings, and relevance to your research question. This may include the disease context, patient cohort, experimental design, or key conclusions.
Upload a figure formatted as JPG, PNG, or similar image format. Include the figure legend to provide context and support interpretation.
The study numbers table captures quantitative information about participants, samples, assays, control groups, disease groups, and cell/nuclei counts. To enter study numbers:
Add study tags by typing and pressing Enter. Use tags to label studies according to disease area, species (e.g., human, mouse, rat), technology, or research theme. Tags facilitate grouping across studies in later analyses and should be true for all downstream linked datasets.
Use the comments field for internal notes or curation remarks that do not belong in the summary.
Existing datasets can be linked to a study under Datasets. This connection allows the app to provide study-level context for all associated data.
Once you complete the study creation, it becomes available to all your project members in the knowing01 app. In the left-hand navigation of the Data center, you see all your studies and linked datasets or hooks with their respective processing status. Clicking on a study displays its details. The Studies view presents the key metadata you entered, including name, authors, year, journal, summary, uploaded figure, study numbers table, and linked datasets. Studies can be marked as favourites and sorted.
Each file uploaded is transformed into one dataset or hook. Datasets contain your own experimental data, while Hooks are personally created lists or results from the Contextualize and Explore results. While only minimal information is required for the transformation, the more information you provide, the better the app can leverage the potential of your data.
You can upload any text file in tabular format. Common file endings of such files are .CSV, .TSV, or .TXT. We automatically detect headers in your file and recognize common field delimiters, such as tabs or commas.
The biotype guides the linking of the dataset to our Cellmap. The app supports three top-level biotypes (Molecular Layer): DNA, RNA, and Protein. Within each, you select a specific second-level biotype (Entity Type) such as Variant, Genomic Range, Gene, Transcript, Protein or Gene Symbol. Read more on the current scope of our Cellmap to learn about how the biotype information influences your analysis results.
We ask you to assign a role to the columns of your file. Information from all assigned columns will be displayed during analysis, so we recommend assigning roles to as many columns as possible.
Note that in every export you will receive the full file information, including unassigned columns. We are not losing your data, but try to reduce complexity with and for you during exploration.
The dataset title will be used to represent the dataset or hook throughout the entire app. We recommend providing a crisp and concise title, including assay type, biosample, and result type (e.g., PWAS - T2D - Plasma Proteins or ATAC peaks - T2D islets).
Parent Study you can connect the dataset or hook to an existing study. This connection allows the app to provide study-level context for the data.
Use the description to provide a brief summary of the data in the file, including measurement methods or technologies.
Provide the effect size definition to clarify what the effect size values represent in your dataset based on the effect size column assigned above. It is important to specify the direction: whether higher values (e.g. fold changes) indicate increased risk in cases or controls, as this can vary across different studies.
Add analysis model information to describe the underlying sample sizes, quality control filters, bioinformatic pre-processing, and statistical methods used.
Add dataset tags by typing and pressing Enter. Use tags to label datasets according to experiment type, species, technology, or indication group. This will facilitate dataset grouping in later analyses. Tags should be specific to the dataset and not overlapping with study tags.
Add the data source (e.g., Supplementary Table 1) to trace back to the original data location.
Use the comments field for internal notes or curation remarks that do not belong in the description.
Once upload is finished and the app processes the file and transforms it into a dataset or hook. Afterwards it is also available to all your project members in the knowing01 app. In the left hand navigation of the Data center, you see all your datasets or hooks with their respective processing status. Clicking on an integrated dataset, its details are displayed.
The top of the detail view covers the key metadata captured during upload, such as title, description, original filename, as well as the selected biotype and analysis model. Furthermore, it contains basic statistics on the number of observations extracted from the file and how many of those observations were linked into the Cellmap and can thus be translated for analyses across biological data types.
If significance or score values are assigned, they determine which observations are considered relevant in Explore and Contextualize. Each dataset has two cutoffs: Lax and Stringent, which you can adjust at any time by clicking edit next to either. For significance-based datasets, choose from standard thresholds (< 0.05, < 0.01, < 0.0001 or < 5e-8). For score-based datasets, choose from top percentile thresholds (Top 20% for Lax, Top 10% for Stringent). The observation count and percentage meeting each threshold are shown to guide your choice.
The assigned column role section allows you to review the roles provided during upload, which determines how the dataset is used in the knowing01 app. In case any column role needs to be updated, please use the File Details Editor (in edit mode).
Choose between two options: Search One and Search Many.
Search One: Search for a human, murine, or rat gene, protein or genomic position and retrieve all observations across all your available datasets. The app auto-translates the search term to all matching biotypes.
Search Many: Search for a Dataset and automatically use the top 20 observations as query for the human, murine, or rat gene, protein, or genomic position observations that are to be found across all your available datasets. The app auto-translates the search term to all matching biotypes.
How it works: The query will first be linked to all matching Cellmap nodes. Especially for Gene Symbols this might result in multiple hits. Second, the Cellmap hits are auto-translated before, finally, being searched for across your available datasets. Search results will show all matching Cellmap nodes, which may be also de-selected by you in order to filter the search results.
All results are consolidated in a single, comparative view, allowing for intuitive comparisons of data distribution and quality across datasets at a glance. The view is interactive, enabling users to filter results by adjusting rows and columns, as well as modifying cutoff criteria to explore the data in greater detail.
The search results are summarized in a visualization that provides a detailed, comparative view of observational data across matched datasets within the same group. Each dot represents the number of observations, with dot sizes indicating relative quantity. The dot pie charts further break down these observations, showing the proportion that meets specific cutoff criteria for each dataset group and match.
The Search results are all observations that were found in your available datasets. You may subset the results further by whether they match to each dataset's stringent or lax cutoff criteria.
Use the export button to download your results. You can export the full result or filter first by query match, dataset group or observation cutoff and download only the filtered selection. Note that only the top 20 query matches can be explored directly in the app. To export all query matches, click Deselect all in the query match filter and then download - the dataset group and cutoff filters still apply. All exports are generated automatically and become available in the Download center.
Explore lets you combine datasets to identify joint or unique components across your data foundation. Build your full selection first, then run the analysis in one go.
 INTERSECT: returns components found in both the current
selection and this dataset.
INTERSECT: returns components found in both the current
selection and this dataset.
 SUBTRACT: returns components in the current selection that are not found in this dataset.
Set a cutoff per dataset where significance values are available.
The Results view is shared across Contextualize and Explore. Components are ranked by significance and grouped by biological comparability according to the current Cellmap version, including homology components across human, mouse and rat, variant or SNP proxy components using linkage disequilibrium information, and genomic range or variant components.
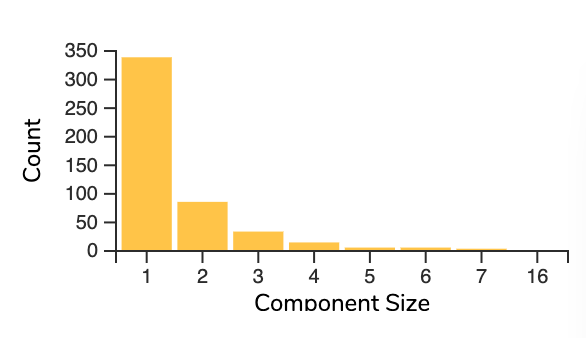
Figure 1. The number of components shown according to component size.
The component size histogram gives an overview of how results are distributed. Filter components by concordance of effect size: up-regulated, down-regulated or mixed, to focus on directionally consistent hits.
Use the Download results button to export your results. All exports become available in the Download center.
All your export requests are sent to the Download center. Large files may take a little time to process and become available for download once ready.
If a dataset is re-uploaded or re-linked after an export was generated, the affected downloads are marked as invalid rather than removed. Your full download history stays visible, so you always know which exports reflect the current state of your data foundation and which ones need to be re-run.
After uploading a file to your project repository, it is processed in two steps before becoming available as a dataset or hook. The progress is shown in the data status field.
The information on biotype plus the tagged columns is used to link the entries/rows of a file (lets call them * observations*) to the knowing01 universe. Imagine that each observation is going to be plugged into our universe according to your tagged information (Figure 2). So, as of today, the more and comprehensive your tags are, the better we can work with the data. We are continuously learning in order to automate this in the future. Check out this figure to better understand the idea of tagging the correct column with what we call "Link Identifier".
Significance tags determine which observations are extracted as relevant during initial upload, according to the following defaults:
These defaults can be changed at any time in the dataset detail view. Files are processed sequentially through an internal queue; large files or simultaneous uploads may take longer.
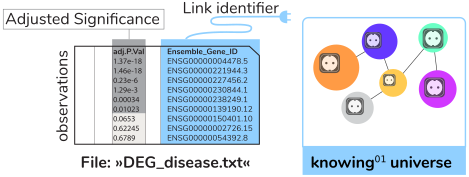
Figure 2. Minimally required information per file. Left: the significance column splits data into relevant and non-relevant observations. Right: the Link Identifier is used to connect observations to the knowing01 universe across biotypes.
Current Version: 6.0
During Explore and Contextualize, data is auto-translated according to the current scope of the Cellmap, allowing comparisons across biotypes.
Version 6.0 encompasses the following biotypes, assembled from public reference databases.
The following translations between biotypes are supported. Figure 3 illustrates the Cellmap knowledge graph in a graph model.

Figure 3. The Cellmap 6.0 knowledge graph covers Gene Symbols and synonyms from human, mouse and rat; genes and their homologs across the three species; proteins and isoforms linked to transcripts and genes; linkage disequilibrium for hg19 variants; and genomic ranges linked to co-localised variants.
When one or more datasets are selected in Explore or Contextualize, we are grouping the observations of the dataset(s) into so called components, whenever they are comparable biologically speaking (see Cellmap for scope). Components are currently given random names for identifiability while we work on biologically meaningful labels.
Six genome-wide significant variants on chromosome 21 (positions 34,593,673–34,626,654) from a GWAS dataset may all be in high linkage disequilibrium (LD), as measured by r2. In Explore, these six variants are grouped into a single component (Figure 4), making it easy to identify independent loci. The same logic applies when intersecting two datasets: a single component is returned when each dataset hits the same LD block.

Figure 4. Variant components explained. Left: dataset A has six significant variants on chromosome 21. Middle: all six are in high LD. Right: Explore groups them into one component.
Let us investigate the component as explore results in the situation of homology. Imagine we have been analysis disease tissue expression with a blood group effect. To that end we analyzed gene expression in three species, namely human, mouse, and rat (Figure 5). We aim to know the overlap of the three datasets with few clicks. In our example the alpha 1-3-N-acetylgalactosaminyltransferase and alpha 1-3-galactosyltransferase gene is significantly regulated in all three species. From our Cellmap we know about the homology although genes are named differently in the different species.
Let us select the three datasets in the explore module and ask to intersect them. As one result hit, the ABO/Abo component is returned, finding and grouping all homologous genes into one group of biologically comparable observations.
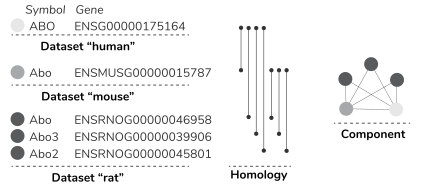
Figure 5. Homology components explained. Left: one or more observations of the gene are significant in all three datasets under different ENSEMBL identifiers and symbols. Middle: the Cellmap knows all five human/mouse/rat genes are pairwise homologs. Right: the intersect returns one component with all five genes.
In the following section, we share the main changes of the different versions of both, the knowing01 SaaS application and the underlying knowledge graph, the Cellmap.
Main updates in V1.7:
Improved Data center and Dashboard: Status consistency
The integration status of datasets and hooks is now displayed consistently across both the Dashboard and the Data center, making it easier to spot datasets that linked with issues at a glance. Linking of newly added entities from the Dashboard has also been fixed and aligns with the Data center display.
Main updates in V1.6:
Explore and Contextualize: Faster component loading
Component data in Explore and Contextualize now loads significantly faster. Backend query handling has been optimized across dataset groups and component item fetching is more efficient for analyses involving multiple datasets.
Main updates in V1.5:
Improved Download center
If a dataset is re-uploaded or re-linked after an export was generated, the affected downloads are now marked as invalid rather than silently removed. Your full download history stays visible in the Download center, so you always know which exports reflect the current state of your data foundation and which ones need to be re-run.
Main updates in V1.4:
New Feature: Filtered Contextualize Export
You can now export exactly what you see. After narrowing Contextualize results by query match, dataset group or observation cutoff, use the export button to download only the filtered selection (not the full result). This keeps your output files focused on the observations relevant to your current question and reduces the cleanup work downstream.
Main updates in V1.3:
New Feature: Data center Dashboard
The Data center Dashboard provides a structured overview of your studies, datasets and hooks. Key metrics, status indicators and tag-based breakdowns are consolidated in a single view, giving you immediate insight into the state and composition of your data foundation.
Main updates in V1.2:
New Feature: Studies
You can now add studies and link them directly to available datasets in your data center. The Studies section is accessible alongside the existing Dataset and Hook views.
New Visualization: Studies View
The Studies View provides a structured summary of individual publications, consolidating key findings, a primary figure, and study numbers in a single view. Each study can be ranked by relevance and methodological quality and displays a overview of its linked datasets.
Main updates in V0.17:
New Feature Update: Contextualize
Now, in addition to searching one query at a time, you can enrich the top 20 observations of each dataset with contextual information—regardless of dataset biotype.
New Visualization
The Contextualize feature enables multi-query searches and summarizes results in a comparative view. This top-level overview displays search matches, the number of matching observations per dataset group, and details on cutoff types.
Main updates in V0.16:
Main updates in V0.15:
Main updates in V0.14:
Main updates in V0.13.1:
Main updates in V0.12:
Main updates in V0.11:
Main updates in V0.10:
Main updates in V0.9:
Main updates in V0.8:
Main updates in V0.6:
Main updates in V0.5:
Main updates in V0.2: